 Pin
Pin I still remember the afternoon my friend asked me to help with her graduation party, and she wanted something whimsical that would make people smile the moment they saw it. We stood in her kitchen, staring at crackers and cheese, when inspiration struck—what if we could turn simple ingredients into tiny graduation caps? It became our secret project, and watching guests' faces light up when they realized each snack was edible made it all worthwhile. Now whenever I need a conversation starter at a celebration, I reach for these little caps.
I'll never forget the look on my cousin's face when she bit into one at her graduation celebration. She laughed and said it was the first time she'd eaten her cap instead of wearing it. That moment reminded me that food memories aren't just about flavor—they're about the joy and laughter shared around the table.
Ingredients
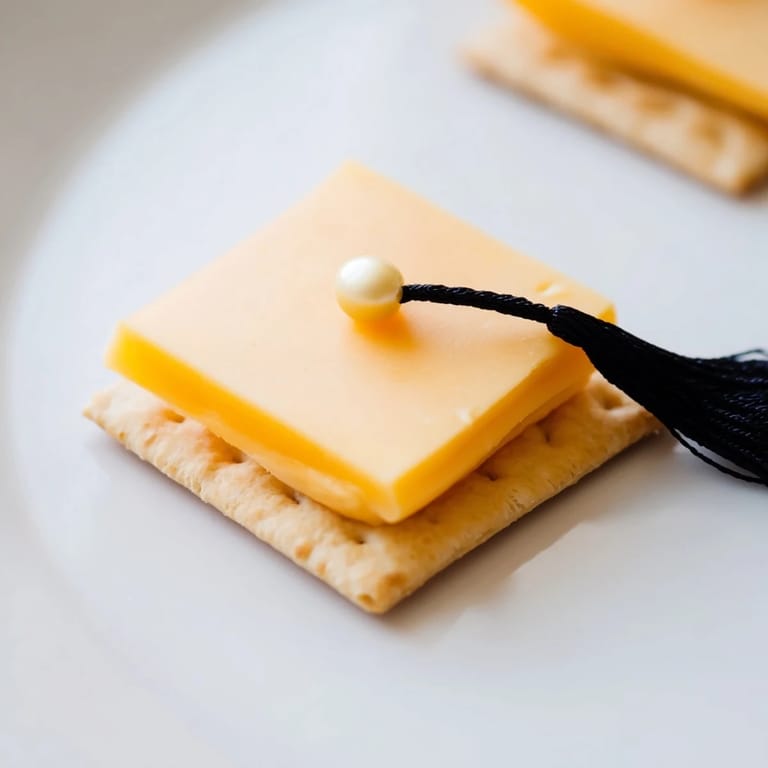
- Square crackers (Wheat Thins, water crackers, or similar): These form the base and cap of your snack—choose ones sturdy enough to hold the cheese without crumbling, and make sure they're actually square so the graduation cap shape is immediately recognizable
- Square cheese slices (cheddar, Swiss, or American): The cheese is what makes this feel indulgent and substantial; cut them into 1.5-inch squares if buying a block, and let them sit at room temperature for a minute so they're slightly pliable for placement
- Licorice strings or dried fruit strips (mango, apricot, or fruit leather): These become the tassels and are where you can get creative—black licorice is the classic choice, but colored fruit strips add a cheerful modern twist
- Cream cheese or hummus (for adhesive): This is your edible glue, and a tiny dab is all you need; I prefer cream cheese because it's more neutral and sets up quickly
- Candy pearls or raisins (optional): These small garnishes sit at the end of the tassel to mimic the button on a real graduation cap and add a final touch of polish
Tired of Takeout? 🥡
Get 10 meals you can make faster than delivery arrives. Seriously.
One email. No spam. Unsubscribe anytime.
Instructions
- Gather your ingredients and set up your workspace:
- Lay out all your ingredients on the counter so you can work quickly without fumbling around. Having everything within reach means you can assemble these in a relaxed rhythm rather than scrambling.
- Build the foundation:
- Place each square cracker on your serving platter or a clean surface. These are your stage, so space them out a bit so the cheese and tassels have room to drape naturally without crowding each other.
- Stack the cheese to form the cap:
- Lay one square of cheese on top of each cracker, lining up the corners carefully. This layering is what creates the distinct graduation cap silhouette—precision here makes all the difference in how recognizable your snacks will be.
- Anchor the tassel:
- Take a small dab of cream cheese or hummus on the tip of a spreading knife, and place it on one corner of the cheese square. Press one end of your licorice string or dried fruit strip into this adhesive, positioning it so the rest of the tassel drapes dramatically down the side. This is the moment they really start to look like caps.
- Add the finishing button (if using):
- Take a tiny candy pearl or raisin and secure it over the base of the tassel with another micro-dab of cream cheese or hummus. This small detail transforms them from cute to completely charming.
- Repeat and serve:
- Work through your remaining ingredients with the same care and attention. These are best served right away while the cheese is still cool and the tassels are perfectly positioned, so make them no more than 30 minutes before your guests arrive.
 Pin
Pin At my cousin's celebration, an elderly guest picked one up, studied it carefully, and said it reminded her of the graduation day she almost missed. We ended up talking for an hour about milestone moments and traditions. That snack became the bridge to a meaningful conversation I'll always treasure.
Customizing Your Graduation Caps
The beauty of this recipe is how adaptable it is to your celebration and dietary preferences. I've made versions with whole-grain crackers for a more substantial snack, herb-flavored varieties that pair beautifully with wine, and even gluten-free crackers for friends with dietary restrictions—they all work wonderfully. The cheese choice is equally flexible; Swiss cheese has a more sophisticated feel, sharp cheddar adds boldness, and white American cheese keeps things classically charming. Once you've made them once, you'll start seeing endless variations that fit your crowd and occasion.
Making Them Ahead
If you're working with a busy party schedule, I've learned that you can assemble everything except the tassel and button up to three hours ahead, covering them loosely with plastic wrap and keeping them cool. The cream cheese or hummus adhesive stays workable during that time, so when guests are arriving, you just need to quickly attach the tassels—it cuts your last-minute stress considerably and means you're not assembling when you should be greeting people.
Serving and Storage Tips
These little snacks are designed for immediate enjoyment, and they truly shine when served fresh with their tassels perfectly positioned and cheese still cool. They don't keep well overnight because the crackers eventually soften, so plan to make them the day of your celebration.
- Arrange them on a tiered platter or cake stand so they're visible and guests can easily reach them from multiple angles
- Keep them in a cool spot away from direct sunlight so the cheese doesn't begin to soften too much during the party
- Make a few extra—they disappear faster than you'd expect because people want to take photos before eating them
 Pin
Pin These snacks remind me that celebrations aren't about complicated recipes or impressive techniques—they're about creating moments that make people smile. Every time someone picks up a graduation cap and realizes it's edible, there's a flash of delight that makes the preparation absolutely worthwhile.
Recipe FAQ
- → What types of cheese work best for the caps?
Cheddar, Swiss, or American cheese slices cut into squares provide a firm base and melt-free texture ideal for assembly.
- → Can I substitute the licorice tassel?
Yes, dried fruit strips like mango or apricot cut into thin strands offer a colorful and natural alternative to licorice.
- → How do I keep the tassel attached securely?
Use a small dab of cream cheese or hummus as an edible glue to firmly stick the licorice or fruit strip to the cheese corner.
- → Are there gluten-free options?
Substitute wheat crackers with gluten-free crackers to accommodate gluten sensitivities without altering the assembly process.
- → Can this snack be prepared ahead of time?
It’s best to assemble shortly before serving to keep crackers crisp and prevent moisture softening.