 Pin
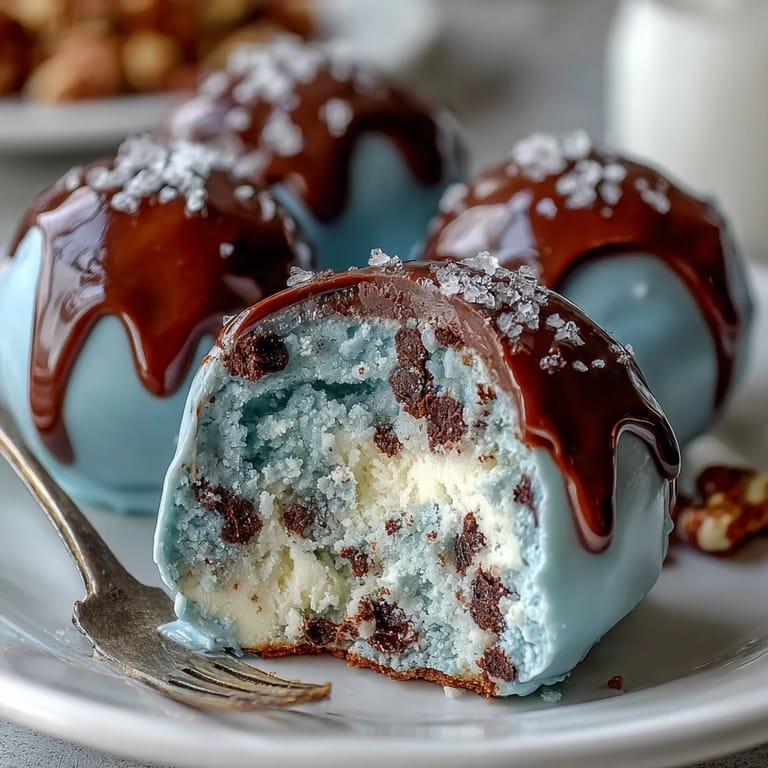
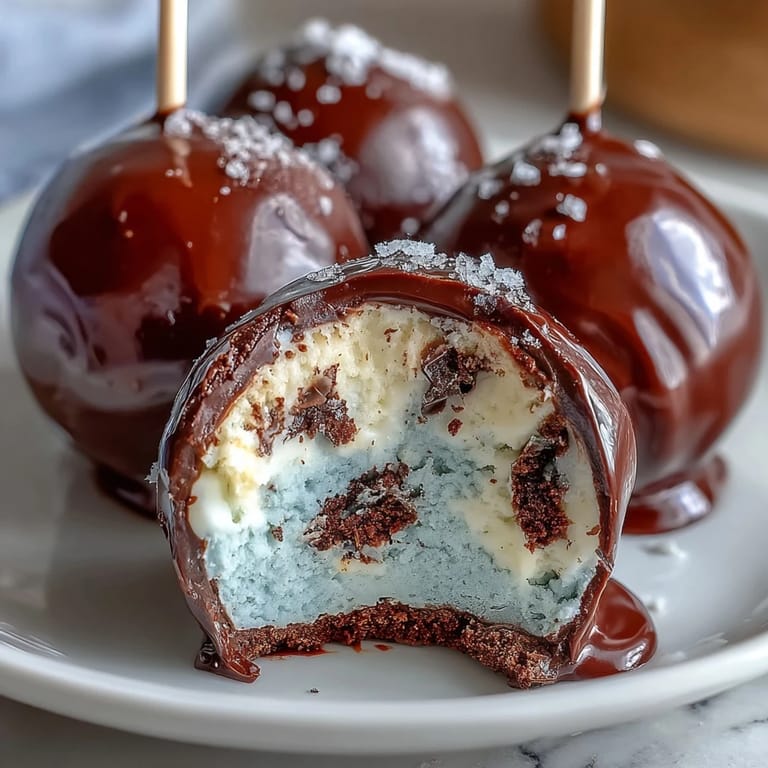
Pin My sister arrived at Easter brunch carrying a cardboard box like it held treasure, and when she opened it, there they were—perfectly round robin's egg blue cake pops catching the spring sunlight streaming through the kitchen window. She'd stayed up late the night before, laughing at herself for getting the color slightly too teal on the first batch, but these ones were flawless. I bit into one and the delicate shell gave way to buttery cake and frosting, and suddenly I understood why she'd fussed over them so much. Now every Easter, someone asks if I'm making them, and honestly, the ritual of rolling, dipping, and speckling has become my favorite part of the holiday.
I made these for my daughter's friend group last spring, and watching six teenagers crowd around the cooling rack to watch me speckle them was hilarious—they were more invested in the process than the eating. One of them asked if she could try, so I handed her the brush, and her interpretation was abstract art, really, but everyone cheered when she added a dramatic swoosh of cocoa specks to hers. They devoured half the batch before dinner even started, and I realized these little pops somehow turned an ordinary Tuesday into something memorable.
Ingredients
- 1 box vanilla cake mix: Using a boxed mix takes the guesswork out of texture and ensures your cake crumbs are moist enough to bind with frosting—I learned this the hard way with a homemade cake that crumbled too dry.
- 1/2 cup softened butter and 1 1/2 cups powdered sugar: These two are the backbone of your frosting, creating that luxurious texture that holds the cake balls together like edible glue.
- 2 tbsp milk and 1 tsp vanilla extract: These ingredients brighten the frosting so it doesn't taste overly sweet or dense once combined with the cake crumbs.
- 12 oz white candy melts or white chocolate: Candy melts are more forgiving than tempered chocolate and create a smoother coating—they're worth seeking out at craft stores.
- Blue gel food coloring: Oil-based gel coloring is non-negotiable here; water-based coloring will cause the chocolate to seize and become grainy, a frustration I've experienced firsthand.
- 2 tbsp coconut oil or vegetable shortening: This optional ingredient is a game-changer if your coating feels too thick, making dipping effortless instead of stressful.
- 1 tbsp cocoa powder and 1-2 tsp vodka or clear extract: The vodka evaporates quickly, leaving behind perfect speckles that mimic a robin's egg's natural markings.
- 24 lollipop sticks and a Styrofoam block: These humble tools transform simple cake balls into elegant presentation pieces that feel special.
Tired of Takeout? 🥡
Get 10 meals you can make faster than delivery arrives. Seriously.
One email. No spam. Unsubscribe anytime.
Instructions
- Bake and cool your cake:
- Preheat and bake the vanilla cake according to package instructions, then let it cool completely on a wire rack—warm cake will make your frosting weep and your crumbs too wet. This is the one step where patience truly matters.
- Whip your frosting until cloud-like:
- Cream the softened butter until it's pale, then gradually add powdered sugar while beating, followed by milk and vanilla—this gradual approach prevents lumps and creates an airy texture. Stop when it looks smooth and spreadable.
- Combine cake and frosting with your hands:
- Crumble the cooled cake finely into a large bowl, then add frosting little by little, mixing with your fingers until the mixture just holds together when squeezed. It should feel like moist sand that's barely keeping itself together, not a wet dough.
- Roll and freeze your balls:
- Use a tablespoon measure to keep portions consistent, rolling each between your palms into smooth spheres—this freezer time is crucial because it prevents your balls from cracking when they hit the warm chocolate. Set them on parchment and freeze for 15 minutes.
- Melt and tint your coating:
- Use either a double boiler (safer, slower) or microwave in 20-second bursts (faster, requires attention), stirring until the chocolate is completely smooth and glossy. Add blue gel coloring slowly, stirring well between drops, until you reach that perfect robin's egg shade.
- Stick and refrigerate your cake pops:
- Dip each stick's tip into the blue coating like you're sealing a promise, then push it halfway into a frozen cake ball—the coating acts as an adhesive. Pop them back in the refrigerator for 10 minutes so they're anchored and won't spin on the stick.
- Dip with grace and purpose:
- Holding each pop by the stick, dunk it into the warm blue coating in one confident motion, twisting slightly, then lift and let excess drip back into the bowl for 2-3 seconds. Place upright in your Styrofoam block immediately, where they'll set and solidify.
- Add your signature speckles:
- Mix cocoa powder with vodka or clear extract until it's the consistency of thin paint, then dip a clean food-safe brush into the mixture and flick your wrist gently over each pop to create those charming speckles. Let your instinct guide you—there's no wrong way to do this part.
- Let them set and admire:
- Allow the pops to sit undisturbed for at least an hour so the chocolate coating firms up completely and the speckles dry. This is the moment where all your effort pays off and they become the showstoppers you've been hoping for.
 Pin
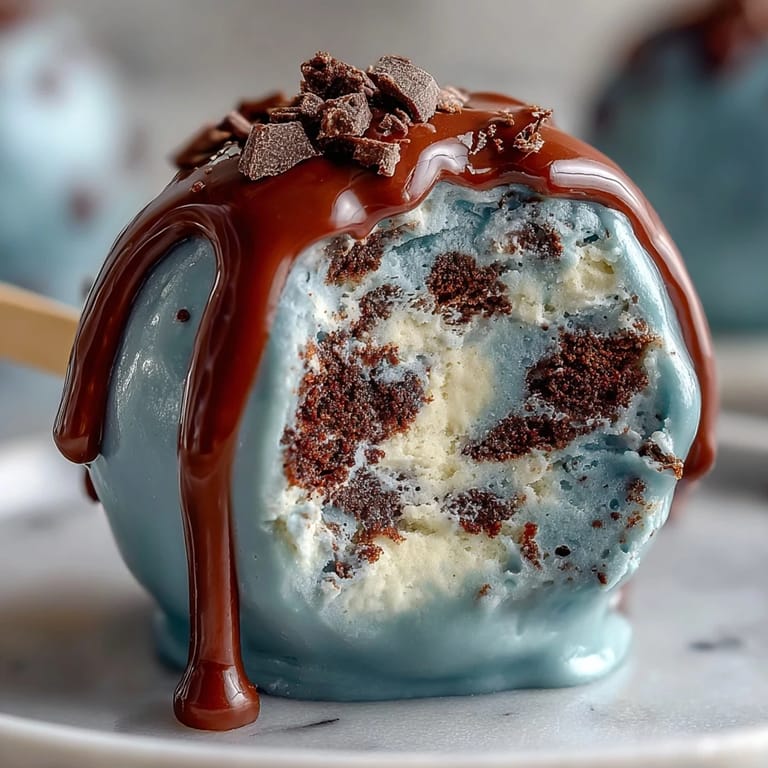
Pin There's something magical about the moment a plain cake ball transforms into a jeweled robin's egg under the coating—my grandmother used to say it was like watching spring happen in your kitchen. That might sound poetic, but when you've got flour in your hair and you're standing over 24 little blue orbs that suddenly look professional and beautiful, it genuinely feels that way.
The Speckle Technique That Actually Works
The first time I tried to add speckles, I used a toothpick and ended up with uneven blobs that looked more like a disease than decoration. Then I learned that vodka mixed with cocoa powder and a gentle brush flick creates that natural, dotted effect that makes them look authentic—like an actual robin's egg dropped from the nest. The key is light-handedness; your instinct might be to be dramatic, but restraint creates the real magic here.
Storage and Flavor Variations
These cake pops are surprisingly durable—they'll sit happily at room temperature for three days if you're serving them at a party, or refrigerate them for a week if you want to stretch them out. I've experimented with lemon zest in the frosting, almond extract in place of vanilla, and even a touch of cream cheese for tang, and every version has been a winner. The robin's egg blue coating is neutral enough to let whatever frosting flavor you choose shine through without fighting for attention.
Making These Ahead and Scaling Up
The beautiful thing about cake pops is they're a two-day project if you want them to be—bake and crumble your cake the day before, then spend 30 focused minutes rolling, dipping, and speckling the next day when your mind is fresh. If you're making these for a crowd, this recipe doubles easily, and honestly, the process doesn't feel twice as long because you get into a rhythm with it. I've made 72 for a wedding shower once, and it was meditative rather than stressful, especially when I enlisted my sister to be the speckler while I handled the dipping.
- Prep your workspace fully before you start—have your sticks, Styrofoam, brush, and cocoa mixture ready so you're not scrambling mid-dip.
- Room temperature is better than cold when you're working with melted chocolate, so don't stress if your kitchen is warm; just work a bit faster.
- These pops actually taste better at room temperature because the frosting inside softens just slightly, so pull them from the refrigerator 15 minutes before serving.
 Pin
Pin These robin's egg blue cake pops have become my answer to the question of what to bring when you want to show up for someone—they're beautiful enough for Instagram but personal enough to mean something. There's real joy in giving someone you care about a tiny, perfect thing that you made with your own two hands.
Recipe FAQ
- → What type of food coloring is best for coating?
Oil-based gel food coloring works best to achieve a smooth, rich robins egg blue without causing the chocolate coating to seize.
- → How do you create the speckled effect on the coating?
Mix cocoa powder with vodka or a clear extract to form a thin paste, then flick it gently over the pops using a small brush for a festive speckled look.
- → Can these treats be prepared in advance?
Yes, after dipping and decorating, they should be allowed to set completely and can be stored at room temperature for up to 3 days or refrigerated for up to a week.
- → What can be used as a stand while the pops set?
A Styrofoam block or a specialized cake pop stand helps keep the pops upright and prevents smudging while the coating hardens.
- → Are there options to alter flavors in the base?
You can add lemon or almond extract to the frosting for a subtle twist that complements the vanilla cake base beautifully.
- → Can these be made gluten-free?
Yes, by using a certified gluten-free cake mix and ensuring all other ingredients are gluten-free, these treats can suit gluten-sensitive diets.